Have you ever found yourself wrestling with a confusing CaseWare file, unsure of where things went wrong? If you’re nodding your head, you’re certainly not alone. CaseWare is a powerful tool, but without a strategic file setup, it can quickly spiral into a complicated puzzle. Properly setting up your files from the start ensures smooth workflows, seamless collaboration, and stress-free audits. By the end of this guide, you’ll have a clear roadmap to automate your workflow, enabling you to focus on what really matters.
Step 1: Choose the Right File Type in CaseWare
Your journey with CaseWare begins by choosing the right type of file. For example, a typical year-end audit for a nonprofit organization might benefit from using a standard template to ensure all necessary documents and procedures are covered, while a one-off review for a small business might mean starting with a blank file tailored to that specific case. Picking the correct format upfront can save you significant headaches later. Here’s how to decide:
- Blank File: Ideal for new, unique engagements.
- Template File: Perfect for repetitive engagements and standardized work.
- Existing File: Suitable when continuing work from a prior year or engagement.
Ask yourself: Is this a recurring task or something completely new? Using templates can significantly streamline recurring workflows.
Step 2: Set Up Your Engagement Profile Correctly
Once you’ve selected your file type, ensure your engagement profile aligns perfectly with your project. This profile contains key details that directly impact the functionality and efficiency of your file setup:
- Entity Details: Name, address, financial year-end.
- Engagement Type: Audit, Review, Compilation, or Special Engagement.
- File Optimizer Settings: Activate only necessary features.
Why does this matter? An incorrect setup might result in inappropriate templates and inefficient working papers which can result in fines and penalties for an incomplete audit.
Get your CaseWare engagement profile right the first time.
Our Accounting Support Solutions include help configuring your file correctly to avoid inefficiencies and compliance risks.
Step 3: Import Your Trial Balance Without Errors
Importing your trial balance is a critical step in setting up your CaseWare Working Papers file. Follow these guidelines for a smooth import:
- File Formats: Excel (.xlsx), CSV, and accounting system exports.
- Account Mapping: Ensure all accounts match your pre-set categories accurately.
- Validation Checks: Confirm balances reconcile correctly post-import.
Common pitfalls to avoid include missing accounts, mismatched entries, or misaligned columns in your import file.
Need help importing your trial balance into CaseWare?
Our Accounting & Bookkeeping Solutions ensure your records are clean, accurate, and audit-ready before you import.
Step 4: Activate SmartSync or Hybrid Cloud File Creation
Using SmartSync or hybrid cloud technology elevates your CaseWare setup to the next level. These features provide unparalleled collaboration and synchronization:
- SmartSync Benefits:
- Real-time collaboration.
- Version control.
- Efficient backups.
- Hybrid Cloud Advantages:
- Remote accessibility.
- Enhanced security.
- Scalable for growing firms.
Activating these tools is straightforward within your engagement setup and pays off exponentially in productivity.
Step 5: Automate with Templates, Silent Install, and Configuration Files
Automation is where the real “accounting magic” happens, drastically reducing manual work and human error. Here’s how to leverage automation tools effectively:
- Templates: Pre-configure standard file setups for recurring tasks.
- Silent Installation: Automatically install and deploy CaseWare settings across your team.
- Configuration Files: Standardize settings and preferences for consistency.
Automation ensures uniformity and compliance across engagements, significantly streamlining workflows.
Prevent CaseWare chaos before it starts.
Our Finance Training programs teach your team CaseWare best practices that improve collaboration and accuracy.
Best Practices to Avoid Setup Nightmares
Avoiding common pitfalls ensures your CaseWare file stays clean, efficient, and audit-ready:
- Maintain consistent naming conventions.
- Regularly archive and compress older files.
- Avoid clutter by removing unnecessary documents and optimizers.
- Create internal documentation for team members to follow.
Following these simple rules prevents your CaseWare file from becoming an unmanageable “wizard’s spellbook.”
Concerned your team’s practices might lead to future chaos? Nasaijit provides comprehensive training to embed best practices into your daily operations.
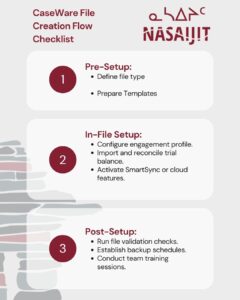
Your CaseWare File Creation Flow Checklist
Keep your workflow streamlined with this checklist:

Use this checklist regularly to reinforce efficiency and consistency.
Need Help? CaseWare Setup Can Be Tricky, Don’t Go Into it Alone.
If your CaseWare files look more like a puzzle than productivity tools, don’t panic. Sometimes even seasoned professionals need a wizard (or Nasaijit) to sort things out.
Don’t let complexity slow you down: book a 30-minute CaseWare setup audit with Nasaijit to streamline your file creation and catch issues before they impact your workflow.
Reach out to Nasaijit for expert CaseWare file setup assistance today!
Read More:
